Authentication
This documentation explains the main mechanism of authentication.
Overview
Main host mechanisms are located in apps.auth.
Login is internally based on a token authentication: each user session is associated to a token.
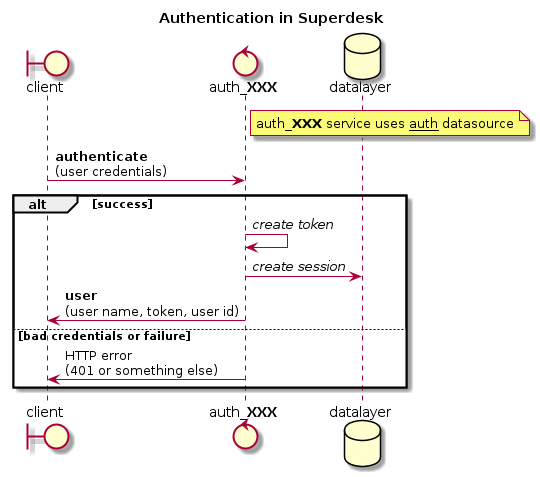
There is a common access point, auth which can be used to log out, but to log in, each authentication mechanism use its own endpoint (auth_db and auth_xmpp so far). This way each endpoint can use its own schema validation while the common endpoint can be called for logout, allowing several auth mechanisms to be running at the same time.
Adding a new authentication mechanism
Adding a new authentication mechanism is done by creating a new endpoint extending the basic service. The new endpoint should be named auth_XXX where XXX is a short name for the new mechanism.
The auth module provide the base features, with main service.
- class AuthService(datasource: str | None = None, backend=None)[source]
- async authenticate(document)
Authenticate user according to credentials
- Parameters:
documents – credentials for this authentication mechanism
- Returns:
authenticated user
- Raise:
CredentialsAuthError if authentication is invalid
- async is_authorized(**kwargs) bool
Check auth for intrinsic methods.
- async on_deleted_async(doc)
Runs on delete of a session
- Parameters:
doc – A deleted auth doc AKA a session
- Returns:
- async update_session(updates=None)
Update current session with given data.
- Parameters:
updates – updates to be made
To implement its authentication mechanism, a module need to override the authenticate method.
When creating a service based on AuthService, the authentication module must use the auth datasource instead of its own endpoint name. This allow several auth methods to use the same session system and to logout from auth common endpoint.
Special case: auth_db
auth_db is used for the basic database login/password authentication. In some cases it may be desirable to replace this mechanism (e.g. this is the case with LDAP). This is done by using the same endpoint name, and avoiding the import of apps.auth.db module. The login/pass default login interface in the client will then stay unchanged.
Other uses of apps.auth
Following functions can be used:
- get_user(required=False)[source]
Get user authenticated for current request.
- Parameters:
required (boolean) – if True and there is no user it will raise an error
Superdesk OAuth
Superdesk OAuth support
Added in version 1.9.
There is oauth resource for authenticating users by email.
Email must be provided by trusted identity service, eg. Google.
The authentication flow with js client is:
Client opens server api url in a new window,.
There is a redirect to auth provider (eg. Google).
Once authenticated user is redirected back to server api url.
There user email from auth provider is used to authenticate user.
Template is rendered with session data which sends message to parent window and popup is closed.
Superdesk Google OAuth
Superdesk Google Authentication
Added in version 1.8.
You can use Google for authentication, first you have to create credentials in Google API console:
set your client URL as Authorized JavaScript origins:
https://example.com
set server URL +
/api/login/google_authorizedas Authorized redirect URIs:https://example.com/api/login/google_authorized
Once configured you will find there Client ID and Client secret, use both to populate Google OAuth Settings.
Changed in version 1.9: There is no need to configure client, it reads config from server now.
Changed in version 1.9: Login url is /api/login/google_authorized instead of /login/google_authorized.
Superdesk SAML Auth
Superdesk SAML Authentication
Added in version 1.9.
Configuration
To enable SAML auth module, add superdesk.auth.saml into INSTALLED_APPS in settings.
Setting SECRET_KEY is also required.
Finally you have to specify SAML_PATH in settings where your settings.json file and
certs are located. See https://github.com/onelogin/python3-saml#how-it-works for more info.
Service provider config for superdesk in settings.json file example:
"sp": {
    "entityId": "http://example.com/api/login/saml_metadata",
    "assertionConsumerService": {
        "url": "http://example.com/api/login/saml?acs",
        "binding": "urn:oasis:names:tc:SAML:2.0:bindings:HTTP-POST"
    },
    "singleLogoutService": {
        "url": "http://example.com/api/login/saml?sls",
        "binding": "urn:oasis:names:tc:SAML:2.0:bindings:HTTP-Redirect"
    },
    "NameIDFormat": "urn:oasis:names:tc:SAML:1.1:nameid-format:emailAddress",
    "x509cert": "",
    "privateKey": ""
}
Superdesk OpenID Connect Auth
Superdesk OpenID Connect Authentication
Added in version 2.1.
Configuration
Superdesk supports OIDC authentication via Keycloak. To enable OIDC auth module, set environment variable
OIDC_ENABLED to True.
Setting SECRET_KEY is also required.
Next you need to create a server client (with confidential
access type) and web client (with public
access type). Both with Valid Redirect URIs set to CLIENT_URL.
Finally with your Keycloak server is running at localhost:8080, SUPERDESK, server_client, web_client
are your keycloak realm, server client, and web client respectively, set following environment variables:
OIDC_ENABLED=True
OIDC_ISSUER_URL=http://localhost:8080/auth/realms/SUPERDESK
OIDC_SERVER_CLIENT=server_client
OIDC_SERVER_CLIENT_SECRET=server-client-secret
OIDC_WEB_CLIENT=web-client